
Hot Rollers Handbook
Ask and you shall receive! Over the last few years, "How do you curl your hair?" has officially surpassed "What do you wear under backless dresses?" as my most frequently asked question. I've been very vocal about using and loving hot rollers, but I realize there are tons of different models on the market, from high to low end, and more than one way to secure them. So, here's my complete rundown on what brand I use and why, what I use to secure them and why, and a step-by-step guide on how to use them. The .GIF-making skills I’ve developed writing my Bachelor recaps came in handy with demonstrating bits that are hard to describe with words. :)
PS—Though I did reach out to t3 to line up a contest with this post, nothing here is in any way sponsored. I already used t3 rollers and just wanted to get some sweet swag for you guys. :) Scroll to the bottom for more about this giveaway!
THE GOAL
There are four reasons I rely on hot rollers versus the other curling methods out there...
1. Volume. Instead of only giving a curl, hot rollers give nice bounce and bit of lift at the root. This is especially the case on day 2 or 3 of washing, when you have that lift paired with a bit of dry shampoo.
2. Its curl is super natural-looking. I find that a curling iron corkscrew curl can often look too perfect, and even strategically "beachy" waves can sometimes look contrived. Out and about, strangers sometimes ask if my hair is natural or if I styled it, which to me is the best compliment. For it to not be a given that I style my hair is my goal!
3. The results are low-maintenance. Because of that natural-looking aspect, I don't have to do much in the way of styling, or worry about errant hairs when I flip my hair around. Even when it's a bit messy it still looks presentable.
4. There's great return on time investment. While my hair is on the straight side, it's not exactly pin-straight either. It's straight but with kinks, and the ends are a bit blah. What I love about hot rollers is it gives the hair good direction—meaning, even if and when the curls loosen and fade—even days later!—that directional wave is still intact. After using hot rollers, even when my hair's been snowed on, rained on (within reason), and just generally flattened out, it'll still be more together-looking than my natural hair. Putting in just a few minutes of hot roller time (it takes me less than 5 minutes to do my whole head) will make my hair more presentable for DAYS.
FYI, here is what my hair looks au naturel, washed at night and air dried overnight...

THE TOOLS
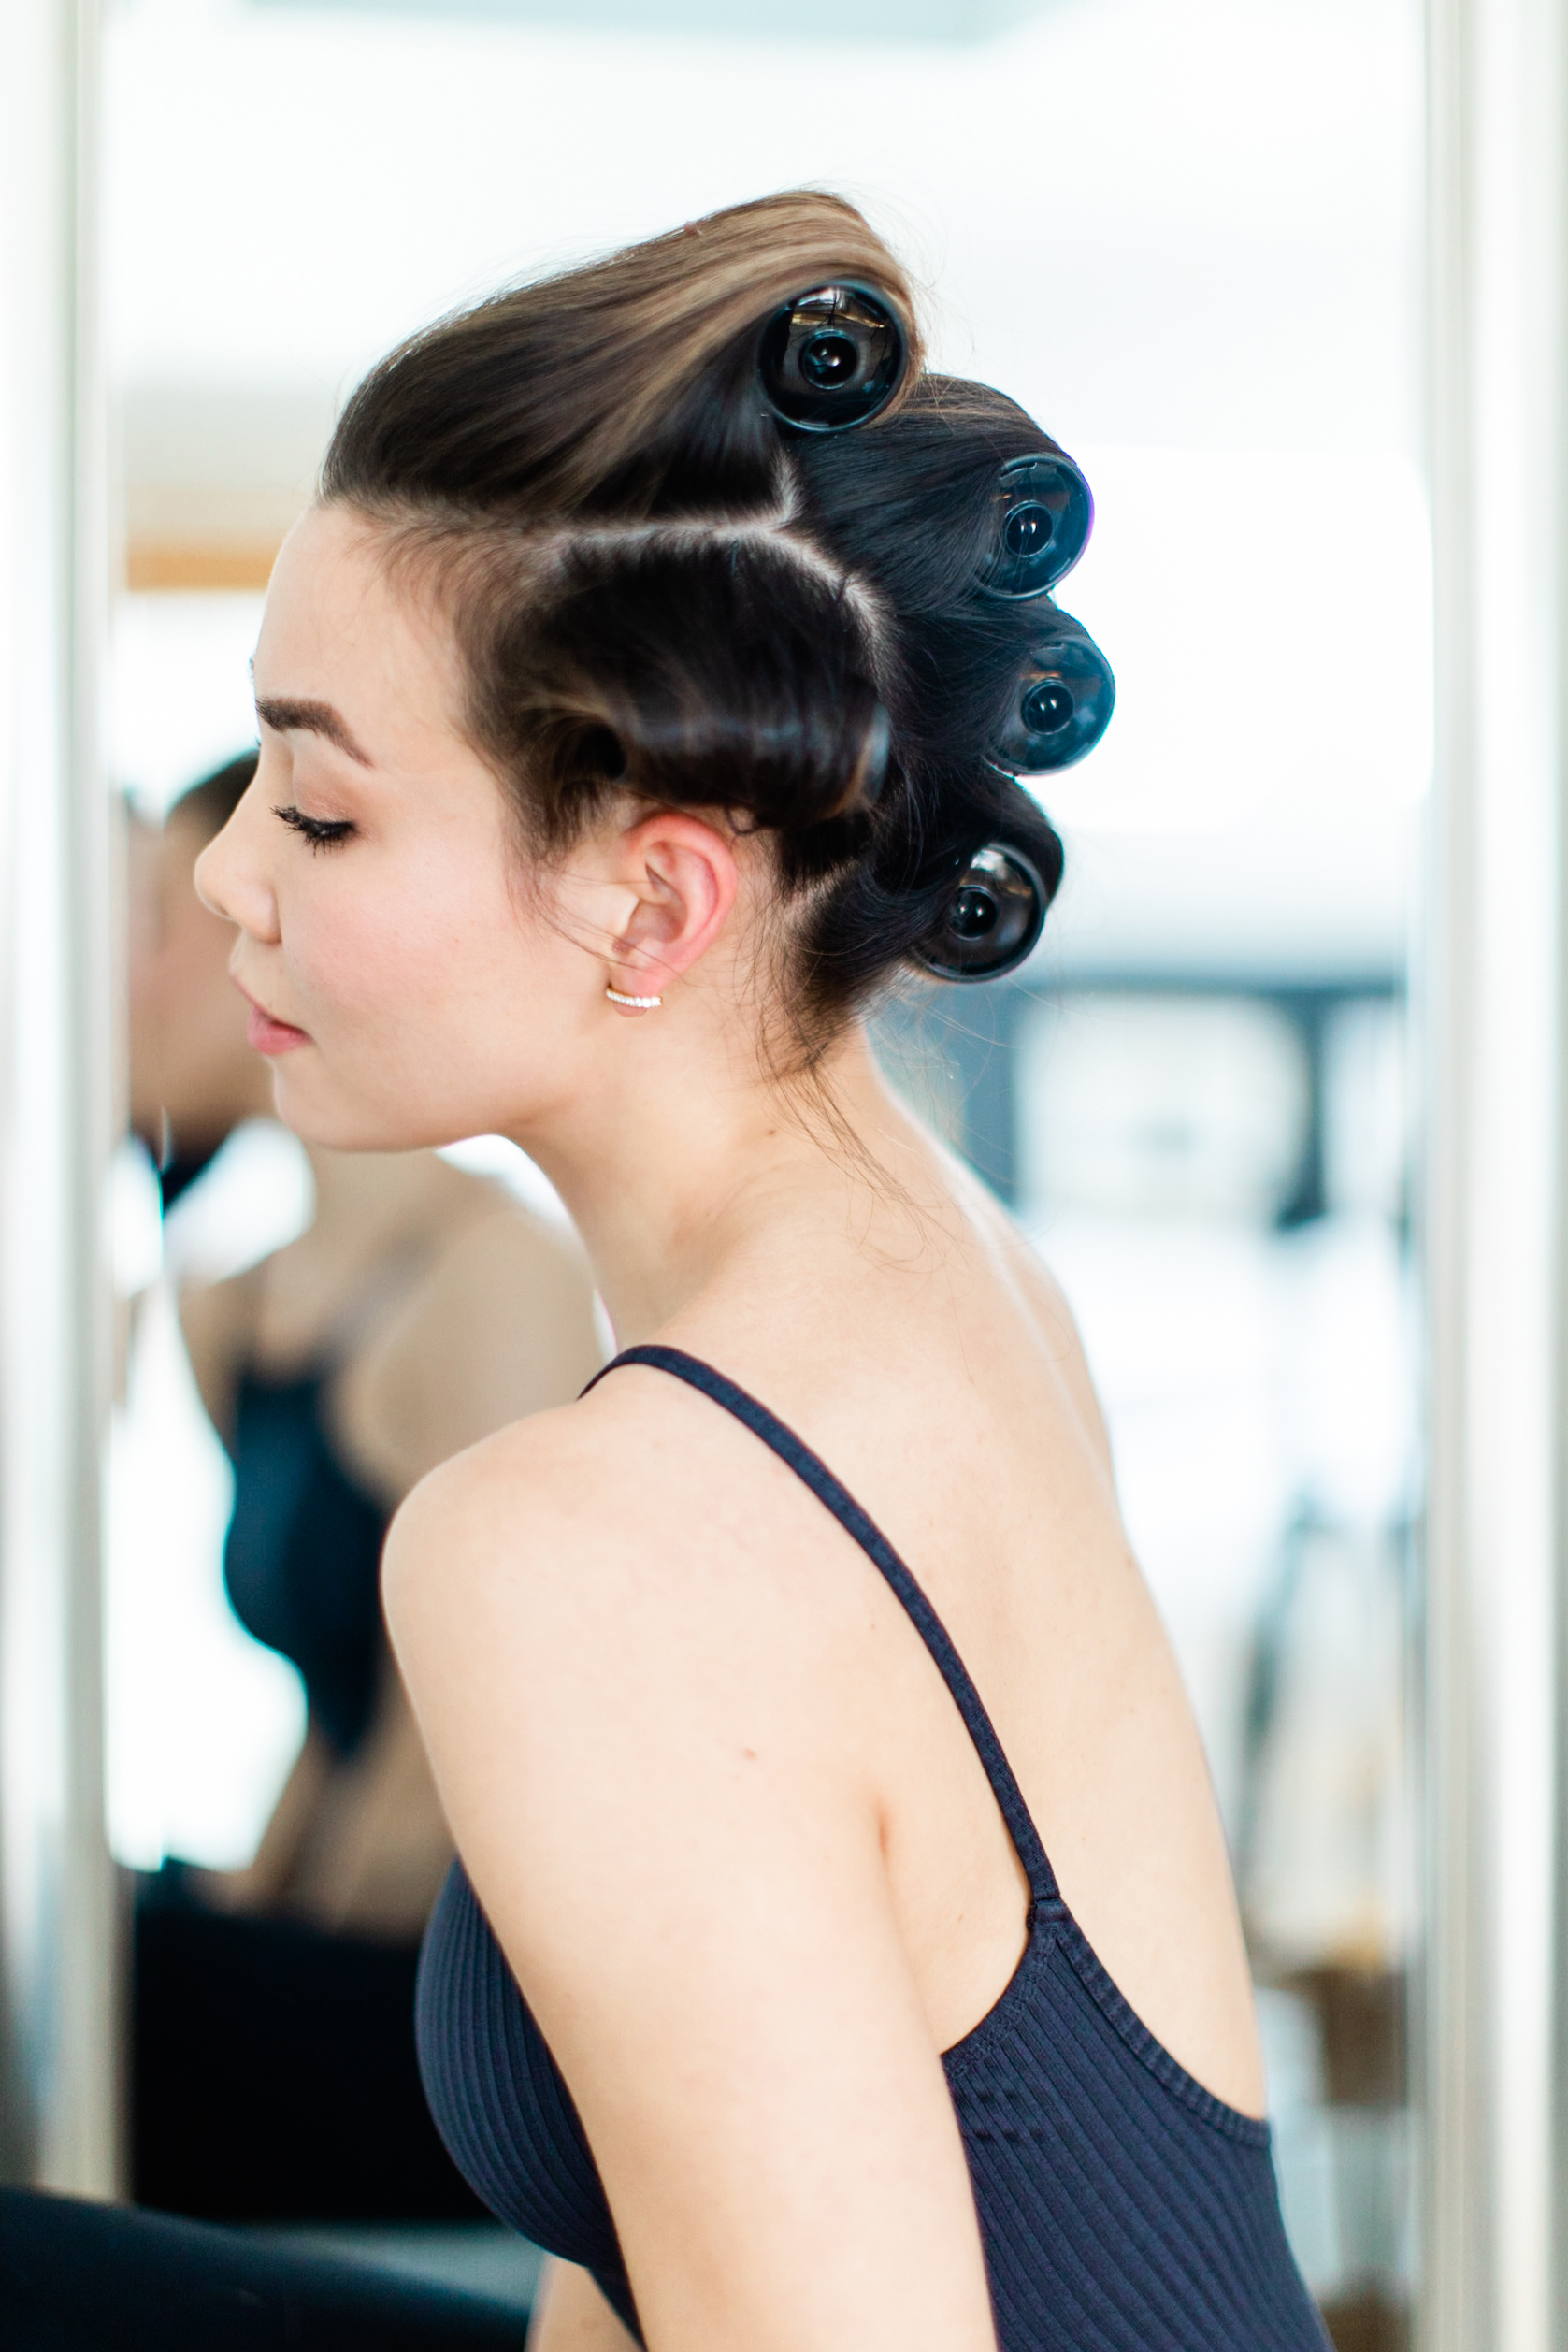
Hot Rollers
T3 Volumizing Hot Rollers Luxe ($120): I've been using hot rollers for around 15 years (!) so at this point I've tried TONS of roller sets and brands. I've used steam rollers, velcro, and countless velvet flocked, heated ones. While I did like and have success with both the Conair and Babyliss sets, when they were on their last legs and it came time to buy a new set, I didn't rebuy them, on the hunt for my Holy Grail hot roller set. When I first got my hands on t3's set (I started with their older model which isn't available anymore), I instantly loved them, and when it came time to retire them (after over 3 years!), I actually rebought the same set (just their newer model). This set is by no means perfect (I'm not sure perfection in hot roller sets exists) but they're pretty darn close. It's more expensive than most other sets but in my opinion the difference is more than worth it. They curl my hair distinctly better and the set as a whole lasts way longer. As with most sets on the market, these indicate when they're heated and good to go, and this particular set has two heat settings (though I don't really use this, truthfully—I just go for max heat every time). But it's these key features that make these my current HG hot roller set...
Customization: Probably my favorite thing about this set is you can really make it suit your needs. If you prefer more volume and less curl, and thus something like a 1.75" roller, you can make your set consist of mostly those sizes. If you prefer a tighter curl, or a sort of mix between the two (like I do), you can swap out rollers for other sizes you can find online.
Longevity: With most sets, I found that I've had to retire them and buy a new set when the clamshell housing was on its last legs. But with these, the base lasts forever. Like I said above, my older set lasted me well over 3 years, which is pretty damn good for daily use and being taken on a plane with me everywhere I go. Best of all, if and when a roller falls apart or you just lose one, as with the customization above, you can just replace that lone roller. In short, one or two old or broken rollers doesn't mean you have to replace the whole set.
Quantity: Inexplicably, so many other sets have a dozen or so rollers. Particularly when they're larger rollers (like 1.5 inch and up), I find this so bewildering. Who on this planet has enough hair to require 12 large rollers? It's ridiculous, and it also means excess in terms of portability and the overall space the set takes up.
Travel: This set is unrivaled in terms of how easy it is to pack up and bring with you. Just about every other set on the market comes in a hard plastic clamshell. I've lost count of how many times those plastic lids have cracked and broken to bits in my suitcase, leaving shards of plastic littered throughout my wardrobe. Also, since those sets tend to have too many rollers, that clamshell is larger than you need. I like how with this set, the case is soft and more flexible in terms of the space it takes up. I also leave the rollers I don't use at home, and that extra space is reflected in a soft case versus a hard plastic one.
Handle-ability: I've found this set to be the best in terms of the heat staying on the velvet and not bleeding into the ends where you're holding them with your fingers. I've never found holding these to be difficult or painful to handle, as I have found to be the case with most past sets.
As for my cons...
Durability: I shouldn't really say this about my new set as I haven't experienced any deterioration yet, but with the older t3 set, the rollers were on the delicate side. Like, sometimes if I dropped one, parts would actually break off. (Amazingly, they'd still work perfectly well, though, so it was more of an aesthetic thing.) Luckily, as I said above, you can buy and replace individual rollers so it's not a huge issue. I've yet to have any breakage with my new set but will update if I do.
Heating: Again, this is judging the older set, but over time with the older set I found that the rollers sometimes struggled to make contact with whatever heat the base was providing. I had to turn the rollers in their stations in order for the heat fork (not sure if it's called a fork?) to actually catch the base and heat up. Not a big deal, but a minor inconvenience. Again, this set is new and I haven't had that issue, but I'm keeping an eye out for it.
Clips: Annoyingly, the t3 hot rollers only come with butterfly clips (those plastic claws you probably envision being used for hot rollers), rather than the far more effective, user-friendly, and portable pins that I use. (More on those below.) This is by far my biggest gripe with this set as it means I source all the the pieces I use to actually secure the rollers elsewhere. If anyone from t3 ever reads this: CHANGE THIS! Or at least add pins to the mix!

Note how the smaller rollers don't have white dots—those are the heat indicators. The small ones are not hot, while the others are. To the left of the hot rollers are U-pins and V-pins.
To Secure
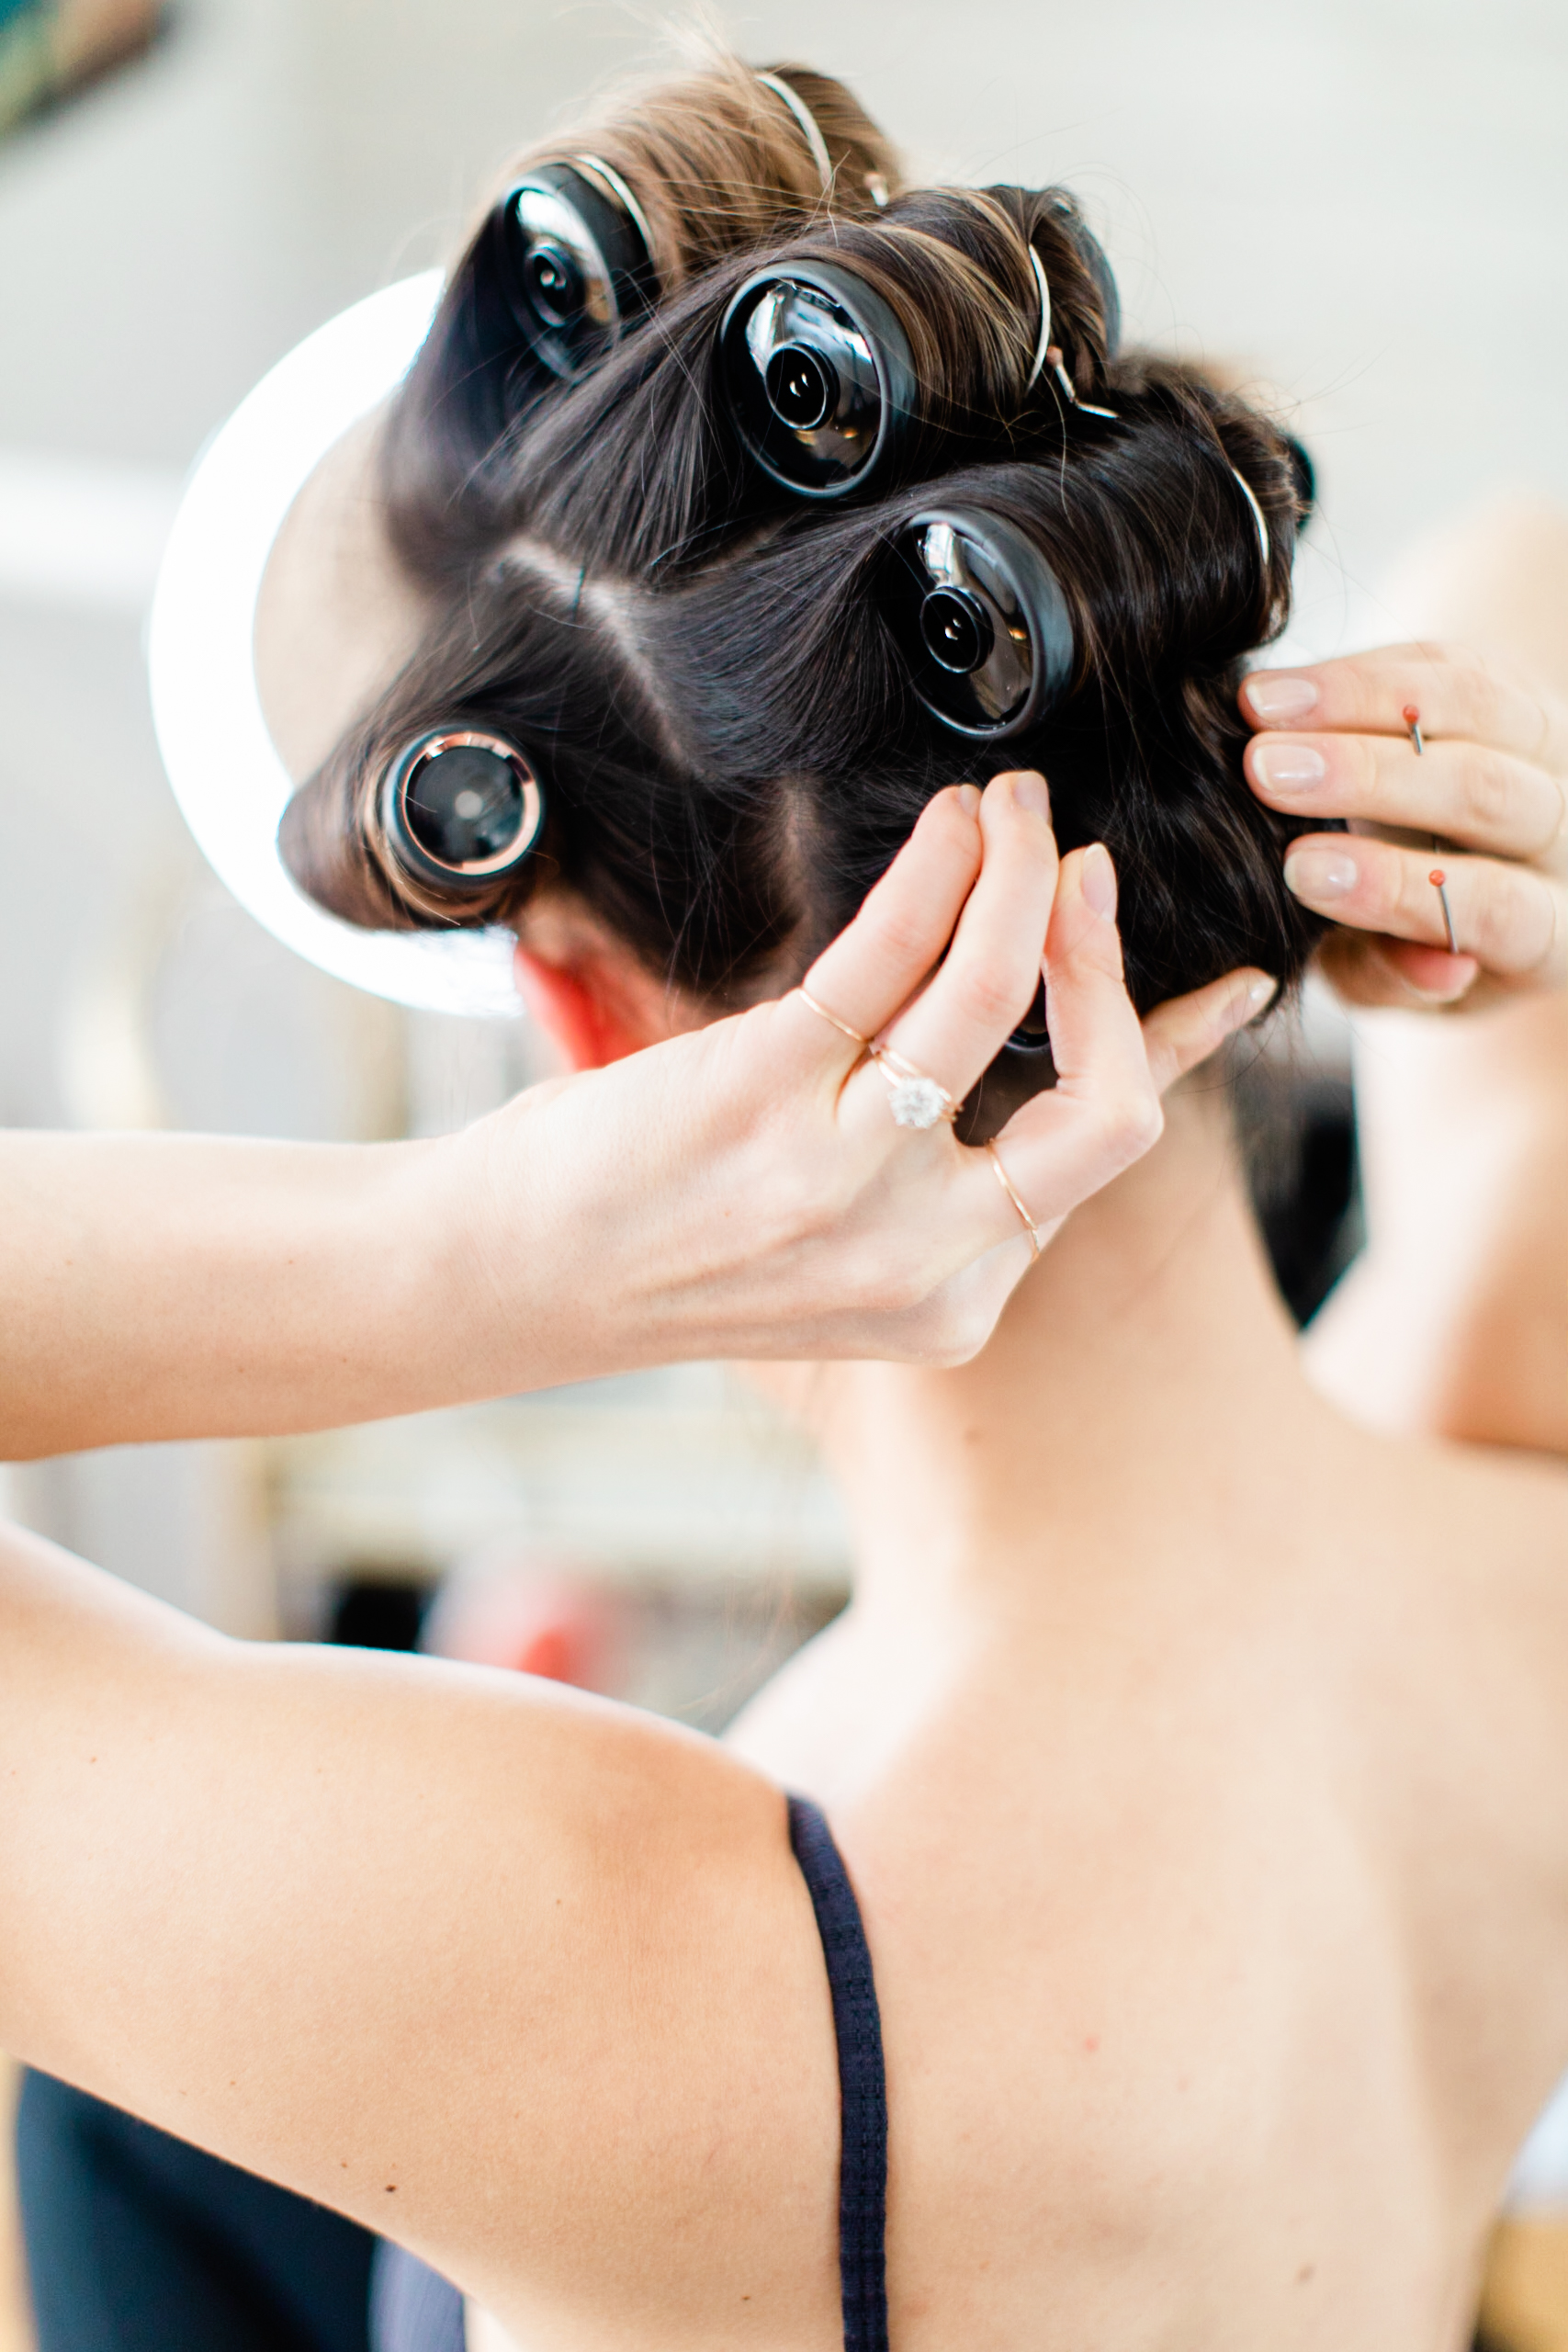
Although the t3 set only comes with butterfly claw clips, I never touch them. (In fact, with each new set, they've gone straight in the garbage where they belong!) Take it from someone who's been using rollers for 15 years: Hot roller butterfly clips are fussy, flimsy, space-consuming, they leave dents, and they're difficult to tightly secure on your noggin, resulting in rollers that wobble around. I CAN'T STAND wobbly rollers—I like them nice and affixed—so I swear by a combination of U-pins and V-pins. Note that you could get by with EITHER U-pins or V-pins (you don't need a combination of both). I just like the flexibility of being able to go back and forth between the two...
"U"-Pins ($4.00-$13.00): Many sets come with a combination of butterfly clips and U-pins. The U-pins are really where it's at, as they are sized to fit the rollers exactly, fitting them—and your hair—like a glove. The fit can be an issue, however, as it's hard to find larger sized U-pins on the market (my own pins are from an old Conair set). In that case, you can easily bypass the U-pins altogether and instead opt for...
"V"-Pins (3" inch, or "Jumbo" hair pins, $2.29): I learned about using these for hot rollers from the hair/wig department in one of my opera houses in Germany. You can bypass "wrapping" the roller altogether, eliminating the risk of dents. When I first realized that this not only works, but arguably better than other methods, my mind was blown. The one catch with these is you can sometimes need two or three per roll, and over time they get a bit bent out of shape, but at this price point and efficacy level, it's hardly an issue.
Honestly, securing hot rollers on your head is the practice-makes-perfect part, but it really does become easy with time. I don't even need a mirror to do this anymore, so just feel it out and you'll get there!
METHOD
Step 1
Deciding exactly how many rollers to use for your entire head of hair is an exercise in trial and error. The popular thought that you need tons of rollers to get a curl is a misconception born from the impression we have of our grandmas with rollers in their hair. In my opinion, you just need enough hair per roller where it can all access the heat of the roller to some degree. For the record, as a hair stylist once told me, I have a "medium amount" of "medium thickness" hair. I have a decent amount of hair, though it's not freakishly thick or anything, and 6 rollers is all I need for my whole head. This surprises most people!
Step 2
Bearing in mind that larger rollers = more volume but less curl (and of course, smaller rollers = less volume but a tighter curl), consider where you want what. My general rule of thumb is to first make a mohawk of sorts, with larger rollers since I want volume on the top of my head (I use 1.5 inch rollers for this section). I then use two smaller rollers on the sides, as that's where I like to have more curl framing my face and volume is less of a concern. Which rollers you use where just comes down to personal preference.
Step 3
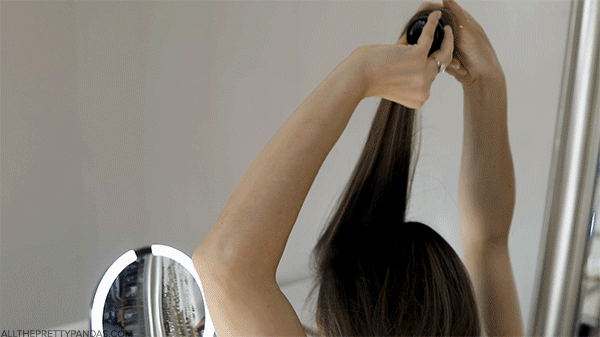
For that aforementioned mohawk, always roll away from your face. Starting at the crown and using your fingers, section a rectangle of hair about the width of the rollers and a few inches deep. Brush it out, and then place your roller underneath the hair a few inches from the ends. Rolling underneath is key, as you want to roll the hair under, not over, for volume from the roots.
Step 4
This is the trickiest step and it takes practice. Wrap the ends under the roller and then roll the rest of the hair right over it. With the ends secured, go back with your finger (or as my German hair/wig ladies did, a metal tail comb) to smooth out any mangled ends. This is crucial, as mangled ends will definitely show in your finished product. Do not skip this step!
Step 5
Continue to roll towards your scalp, and when it's nice and tight, secure it with a pin. When using a U-pin, come at the roller from behind (the open end facing the opposite direction you just rolled), and hook the roller at about a 90-degree angle, then tilt under to secure it...
Coming at a 90-degree angle will allow the pin to gather hair, or as I call it, the "meat"—your pin can only secure tightly if it has some "meat" to hold onto. If you're using V-pins, with the open end of the "V" facing the opposite direction you just rolled, slide the pin in on the underside of the roller, avoiding wrapping the roller altogether...
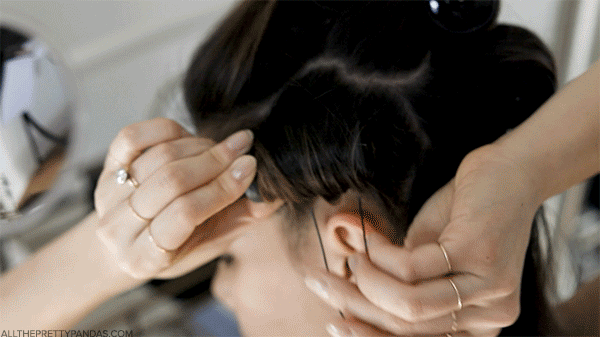
You may need more than one pin per roller, it just depends on how secure that first one is and if the roller still feels too loose or wobbly at all. Pinning takes a bit of practice but you'll get the hang of it quickly.
In general, don't worry about perfection when rolling and securing! Your rollers might look a bit janky on your head but that won't reflect the finished product!
Step 6
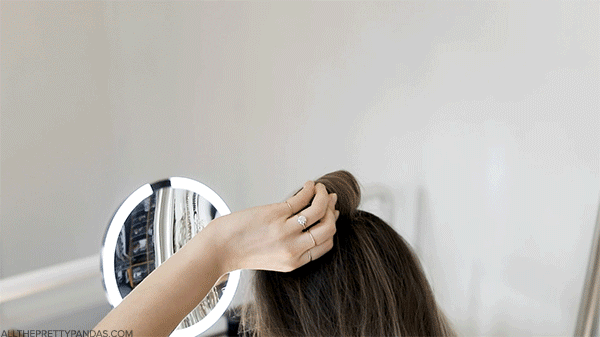
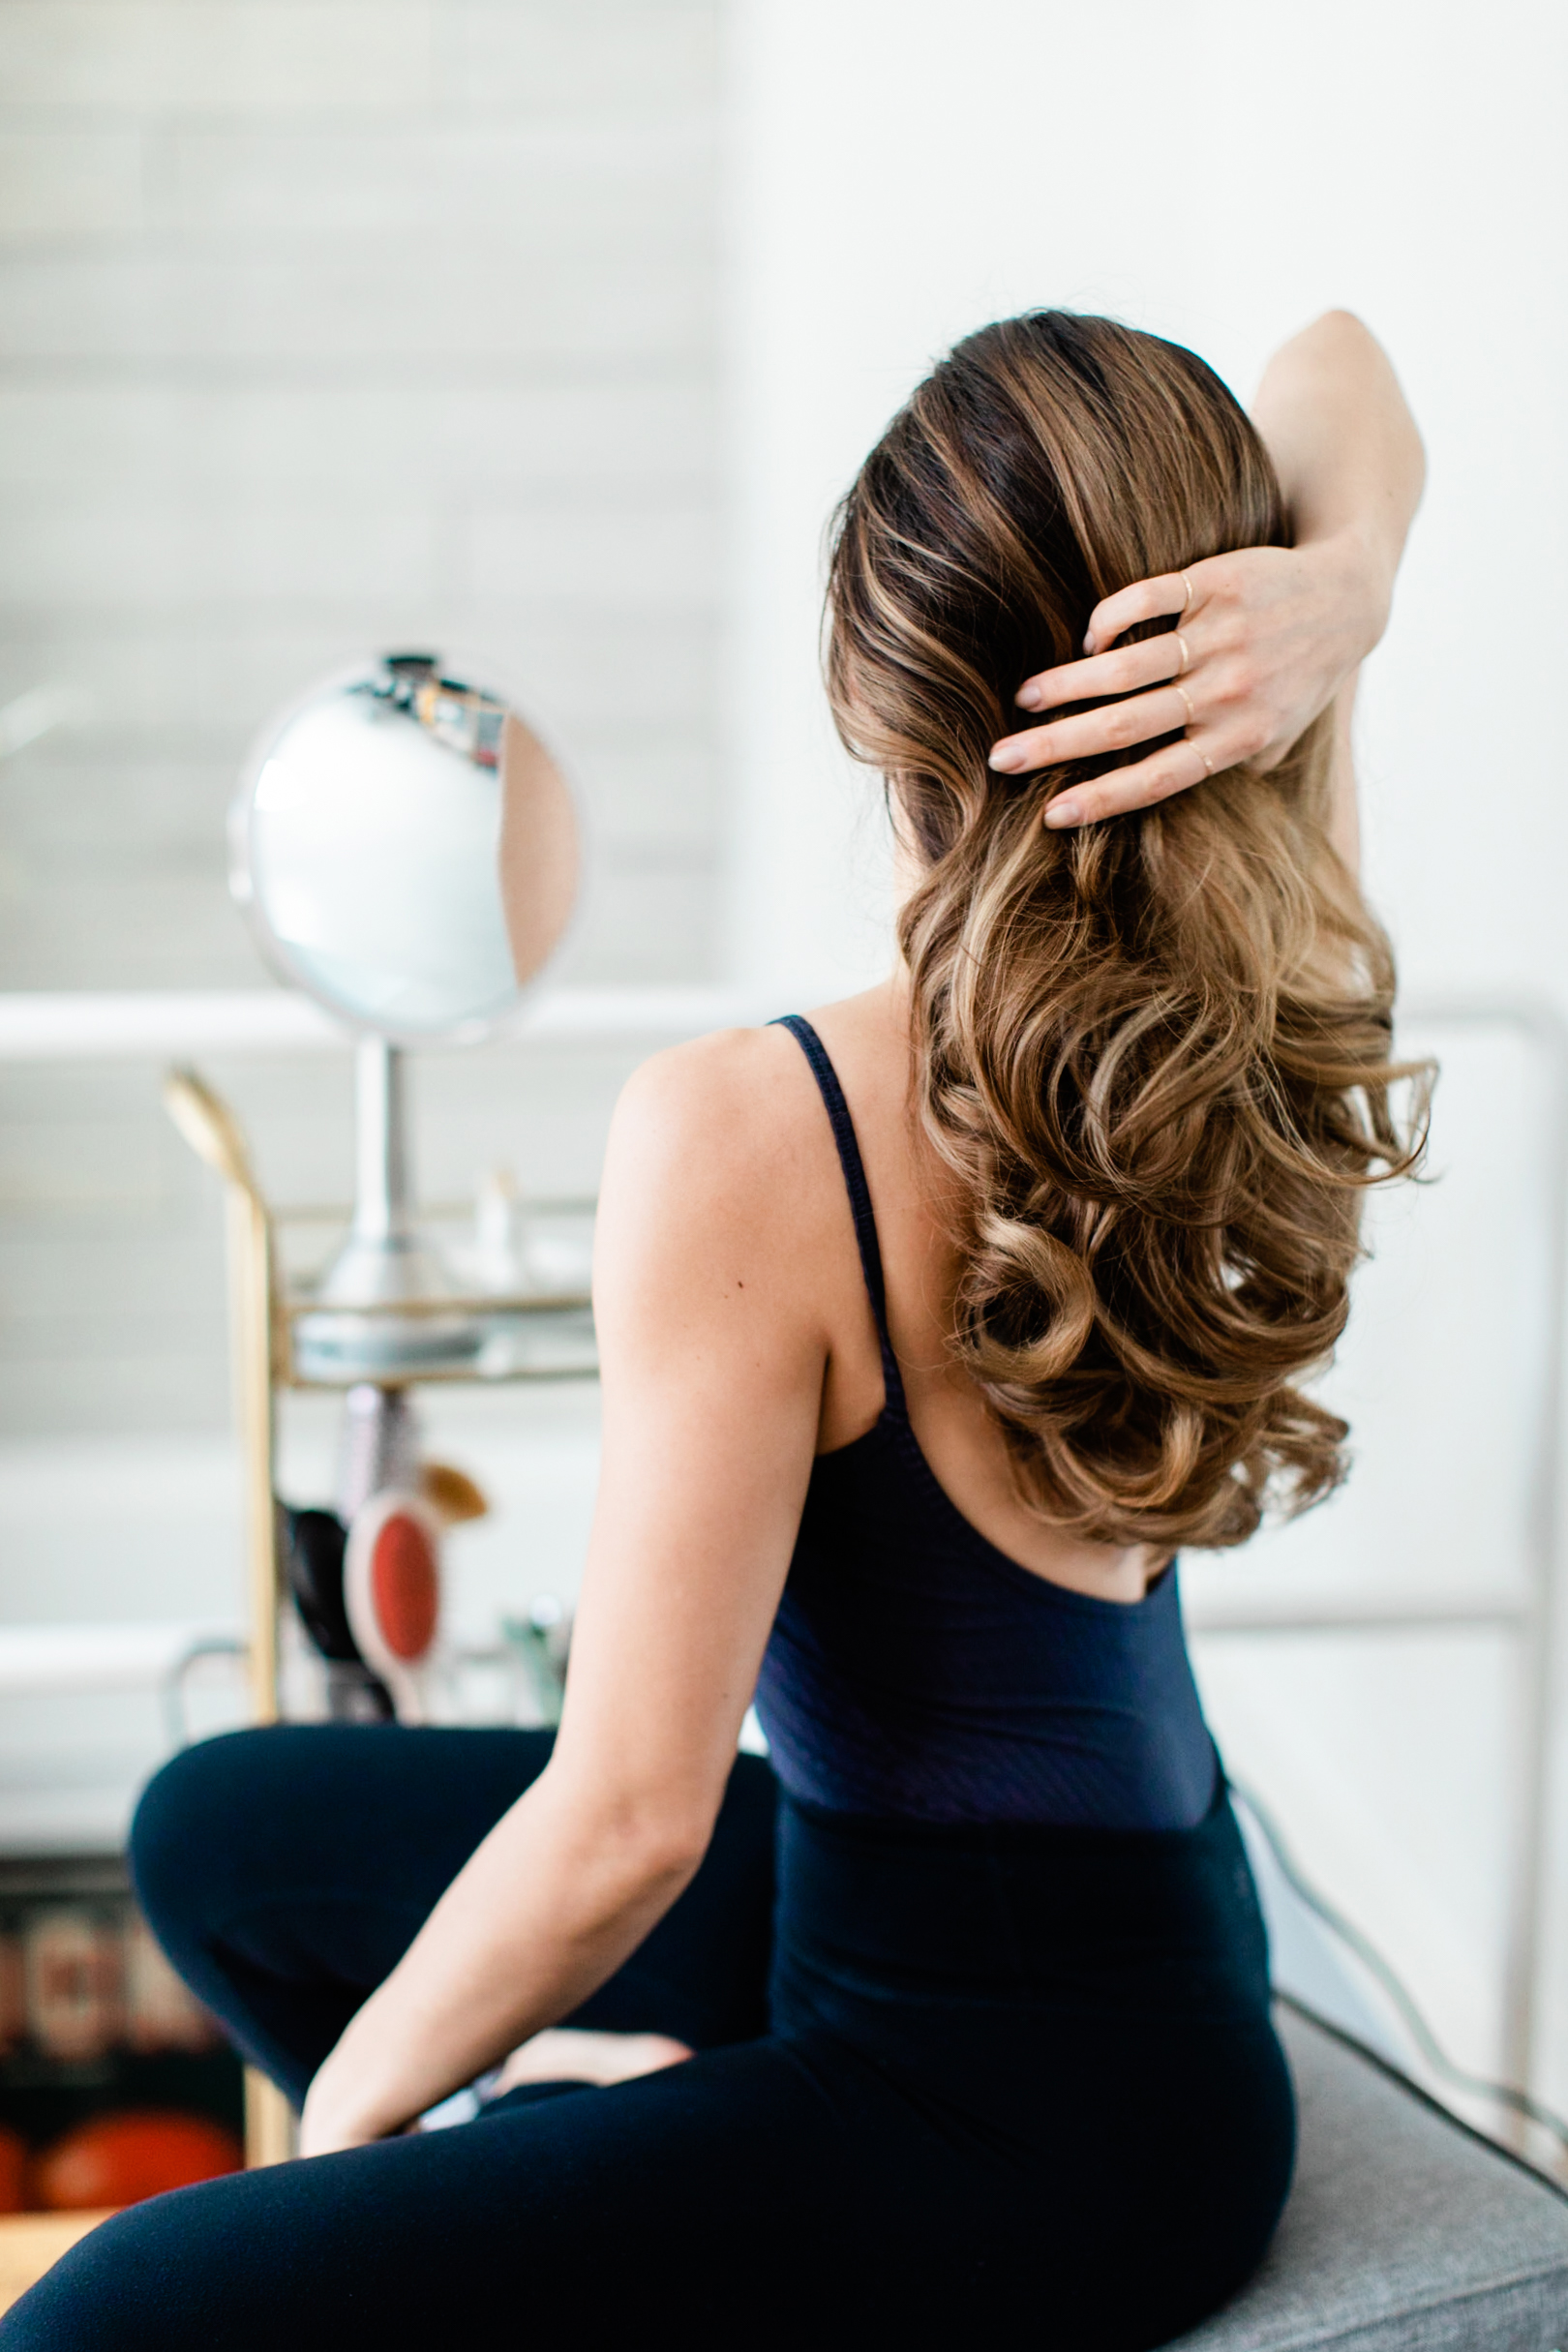
Finally, when you need to head out or when the rollers have cooled (if I'm not in a time crunch I tend to wait until the heat is completely gone), just remove the pins and rollers one by one and gently fluff your hair to blend the separate sections. This is the easiest part—there's virtually no styling steps necessary as the goal is for it to look natural, a bit undone, and not too styled anyway. A simple head flip and a quick spritz of hair spray is all you need.

🎉 GIVEAWAY 🎉
I reached out to t3 and they were kind enough to provide some swag for a giveaway!
FIRST PRIZE is a fabulous t3 bundle valued at $470, including the Volumizing Hot Rollers Luxe set I use, the brand new Cura Hair Dryer, spare sets of 1-inch Rollers and 1.25-inch Rollers, the Dry Vent Brush, the Volume 2.5 Brush, and the Smooth Paddle Brush!
SECOND PRIZE is more basic but still fabulous, valued at $160: the Volumizing Hot Rollers Luxe set and the spare sets of 1-inch and 1.25-inch rollers!
The contest took place over on Instagram and is now complete. Thanks to all who participated!

SHOP THE POST
FEATURED: T3 VOLUMIZING HOT ROLLERS LUXE | 1" AND 1.25" ROLLERS | U-PINS | V-PINS [3-INCH] | METAL TAIL COMB
HARDWARE: WORLD MARKET "COLE" GOLD 3-TIER ROLLING BAR CART | INSPIRE Q "PARTON" X-BASE OTTOMAN BENCH IN GREY LINEN | SIMPLE HUMAN SENSOR VANITY MIRROR | SASS & BELLE UNICORN CERAMIC JEWELRY DISH | CONTAINER STORE MOOSE WALL JEWELRY HOOK
I'M WEARING: ARITZIA WILFRED "ANNECY" BODYSUIT IN KINETIC | LULULEMON "WUNDER UNDER" HI-RISE TIGHT | BAUBLEBAR "ELLE" CRYSTAL STUDS
PHOTOS / VIDEOGRAPHY

Let me know your thoughts and questions in the comments section below! And be sure to share any photos of your fabulous curls with me. :)
Thanks for stopping by!
